How to Create & Manage
Your Solana Token
Follow these steps and you'll be live in minutes - no coding required.
Go to Create Token and connect your wallet
Open the create Solana token page and click Connect Wallet. Phantom, Solflare, Backpack, and other Solana wallets work the same way. Nothing is sent on-chain until you approve the fee at the end.
On the page you'll see something like:
Once connected, the form appears. Fill it in step by step below.
Fill in the same form as on Create Token
The live page uses four stages: Token Identity, Supply & Economics, Optional Features, and Ready to Mint. Below is a read-only preview that mirrors the real create token form one-to-one - same labels, same fields, same order.
Base fee is 0.1 SOL. Stage 3 (Optional Features) is exactly that - optional. You can launch for the base fee alone.
Watch the whole flow
The same form, filled top to bottom in a few seconds - the static field-by-field breakdown is below.
Token Created!
Your SPL token is live on Solana mainnet
This preview matches the real form one-to-one. You can skip Stage 3 entirely and launch for the 0.1 SOL base fee.
When your token is minted
After the transaction confirms, the Create Token page opens a modal with this card (same design as on the live site): Confirmed on Mainnet, Token Created!, mint and signature with copy buttons, links to View Token, Solscan, and Orb, your Token Dashboard, then What's next? with Add Liquidity, Share Token, and Trade on DEX. Yours will show your real mint, signature, and prefilled liquidity link.
Token Created!
Your SPL token is live on Solana mainnet
Mint Address
7xKXtg2CW87d97TXJSDpbD5jBkheTqA83TZRuJosgAsU
Transaction Signature
5BmbBF6RYoRrydPqbxb8gH1ztnwaLbPvWEfmV2U4qzPn9YzQExampleDemoSigNotReal
What's next?
Demo uses sample addresses. After a real mint, your modal shows live values and your Add Liquidity shortcut includes your mint, supply, and decimals.
Steps 1 to 3 above are the full path from wallet connect through the success modal. Everything below is optional depth: what each field means, add-ons explained, mistakes to avoid, and a checklist for after you mint (including liquidity). Jump to Create Token whenever you are ready.
Understanding Token Parameters
Same fields you saw in step 2, with extra context. They are permanent once your token is created, so choose carefully.
Token Name
The full name of your token (e.g., "My Awesome Token"). This appears in wallets and block explorers. Choose a name that's memorable and represents your project well.
Tip: Keep it under 32 characters for best compatibility. Avoid special characters that might cause issues.
Token Symbol
The short ticker symbol (e.g., "MAT"). This is what traders see in exchanges and wallets. Typically 3-5 characters, uppercase.
Tip: Make it unique and easy to remember. Check if your symbol is already taken on major exchanges.
Total Supply
The total number of tokens that will ever exist. This is a critical decision that affects your token's economics. Common supplies range from 1 million to 1 billion tokens.
Tip: Consider your use case. Smaller supplies create scarcity, larger supplies allow micro-transactions. See our tokenomics guide for help.
Decimals
The number of decimal places your token supports. On Solana, 9 decimals is standard and recommended. This allows for precise pricing and small transactions.
Tip: Use 9 decimals unless you have a specific reason not to. This matches SOL's decimal precision and ensures compatibility.
Optional Features Explained
Understanding these options helps you make informed decisions about your token.
Authority Revocations
By default, tokens have three authorities: mint, freeze, and update. Revoking these authorities increases trust and security by preventing future changes.
- Mint Authority: Allows creating more tokens. Revoke for fixed supply.
- Freeze Authority: Allows freezing token accounts. Revoke to show decentralization.
- Update Authority: Allows changing metadata. Revoke to lock final details.
Learn more in our authority revocation guide.
Creator Branding
Add your creator information, website, and social media links to your token's metadata. This helps with discovery and builds trust with potential holders.
Tip: Include your Twitter, Telegram, and website links. This information appears on block explorers and helps people find your project.
Logo Upload
Upload a logo for your token. This appears in wallets, block explorers, and trading platforms. Use a high-quality image (512x512 pixels recommended).
Tip: Use a square image with transparent background. Test how it looks on both light and dark backgrounds.
Common Mistakes to Avoid
Learning from others' mistakes can save you time and money.
Typo in Token Name or Symbol
Double-check your token name and symbol before confirming. These are permanent and cannot be changed after creation. A typo can hurt your brand and confuse users.
Wrong Supply Amount
Setting the wrong total supply is a costly mistake. Too many zeros or too few can make your token unusable. Always double-check the number before confirming.
Not Planning for Liquidity
Creating a token without planning for liquidity means it can't be traded. Plan your liquidity strategy before creating. See our liquidity guide.
Skipping Authority Revocations
Keeping all authorities reduces trust. Consider revoking unnecessary authorities to show commitment. However, only revoke if you're certain you won't need them.
Poor Logo Quality
A low-quality or unprofessional logo hurts your token's credibility. Invest time in creating or commissioning a good logo. It's one of the first things people see.
Next Steps After Creating Your Token
Following these steps ensures your token launch is successful.
Verify on Block Explorer
Visit Solscan.io and search for your token's mint address. Verify all details are correct: name, symbol, supply, and metadata. Take a screenshot for your records.
Plan Your Launch
Don't rush to launch immediately. Use our pre-launch checklist to ensure you're ready. Plan your marketing, prepare your community, and set up social media accounts. See our launch strategy guide for comprehensive planning.
Add Liquidity
To make your token tradeable, add liquidity to a Raydium pool. On the Create Token success screen, click Add Liquidity Now to open our Create Liquidity tool with mint, decimals, and supply prefilled. You can also use Raydium or Orca directly. See our liquidity guide for full instructions and our DEX comparison.
Build Your Community
Start building your community before launch. Create Twitter, Telegram, and Discord accounts. Engage with crypto communities and share your vision. See our community building guide for strategies.
Market Your Token
Effective marketing is crucial for success. Use social media, crypto forums, and community engagement. See our marketing guide for comprehensive strategies.
Frequently Asked Questions
Short answers to common questions.
How long does it take to create a token?
Do I need to know how to code?
How can I make my token tradeable?
Can I rename or delete my token?
What's the minimum cost to create a token?
Should I revoke token authorities?
What wallet should I use?
Can I create multiple tokens?
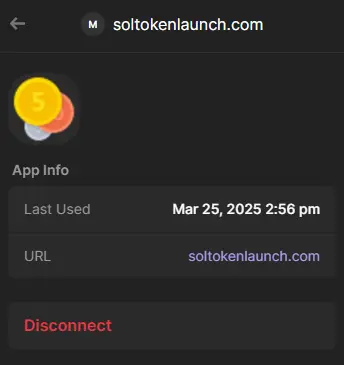
How to disconnect your Phantom wallet
If you want Phantom to prompt again next time, remove the site from Connected Apps:
- Open Phantom Wallet.
- Go to Settings → Connected Apps.
- Select SOLTokenLaunch.com and tap Disconnect.
- Refresh this page.
Ready to launch?
Create your Solana token today
No coding required. Live on mainnet in under 60 seconds.